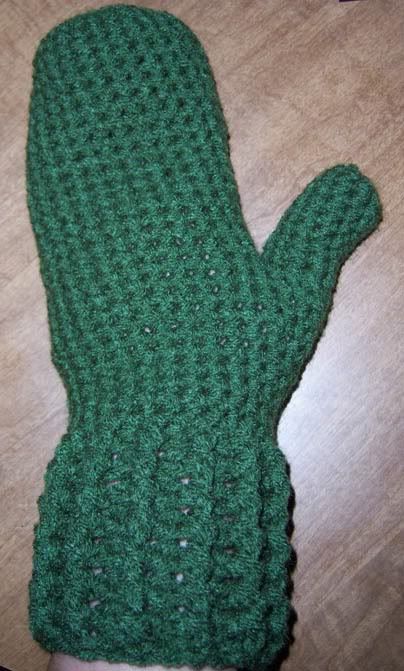
Monday, October 19, 2009

Easy Crochet Mittens Free Pattern

Ok, so a bunch of people asked me for the pattern I used for the crochet Bella Mittens. I made them myself with my own pattern. I don't make mittens the way most people do so bear with me. I am putting pictures so you can see how I do it.
here is the top


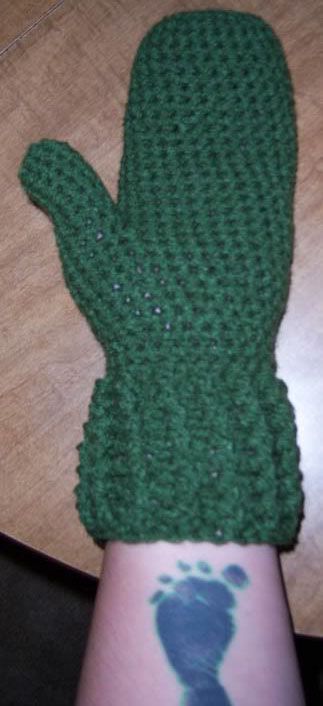
and here is the bottom


Easy Mittens
by: AprilDraven

for personal use only

Yarn: Regular 4 ply worsted yarn

H hook

Abbreviations:
Rnd: round
Sc: single crochet
Ss: slip stitch
FO: Fasten off
hdc: half double crochet
dc: double crochet
fpdc: front post double crochet
bpdc: back post double crochet

*NOTE: use a marker and work in rounds*

ch 2 or form magic circle
Rnd 1: 8 sc in ring
Rnd 2: 2 sc in each sc around (16)
Rnd 3: *1 sc, 2 sc in next sc* rep from * to * around (24)
Rnd 4-19: sc in each sc around
ss 1, FO
(this is the hand part)
Thumb:
ch 2 or form magic circle
Rnd 1: 8 sc in ring
Rnd 2: *2 sc, 2 sc in next sc* rep from * to * around (10)
Rnd 3-9: sc in each sc around (7 rounds)
ss 1, FO

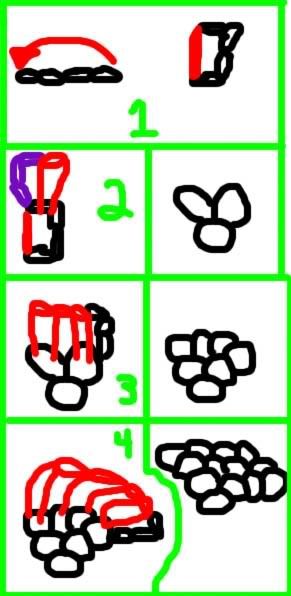
by this point you should have 2 pieces that look like this.

If you have bigger hands or longer hands adjust accordingly. add a couple rounds or subtract a couple rounds to make it smaller. The pieces should fit like that.

Take the thumb and sew it to the hand piece 4 stitches


then attach yarn anywhere on the bottom and sc around thumb and whole mitten. You should have 30 stitches total. (of course the count would change if you altered the pattern)

Rnd 1-3: sc in each sc around (3 rounds)
Rnd 4: *4 sc, sc2tog* rep from * to * around
Rnd 5-9: sc in each sc around
at this point if you wanted to make the entire mitten single crochet you could just keep going until you reached your desired length. I didn't I changed it up.

Rnd 10: ss1, ch 2, hdc in each sc around, ss1 to join
Rnd 11 to desired length: ch 2, *1 fpdc, 1 bpdc* rep from * to * around
ss 1, FO.

**********************************************************************
Creative Commons License
This work by April Folts is licensed under a Creative Commons Attribution-Noncommercial-No Derivative Works 3.0 United States License.

*******************************************************************************
Any donations are welcome and appreciated.


Thursday, October 8, 2009

Sweet November Scarf/Shawl Free Crochet Pattern

Ok so a few days ago I was watching Sweet November and I couldn't stop wanting the scarf/shawl she was wearing. So I made my own :D Sorry about the bad pics it is really hard to take pics of yourself in the bathroom mirror, especially pics of your own back LOL. If you can't see all of the pics, right click on the picture and select view picture.


Here is a couple pics of what the scarf/shawl is supposed to look like


******UPDATE 11-20-09*****

Here is a pic to show an up close view of the stitches

I hope this helps clear up some confusion. (this is just the tip, not the whole thing)

************************


Sweet November Scarf/Shawl
by: AprilDraven

for personal use only

J hook

Abbreviations:
Rnd: round
ch: chain
dc: double crochet

Yarn: I used a little over 6 oz of Caron Simply Soft 100% acrylic Worsted medium 4ply Autumn Red

ch 4, 1 dc in 1st ch, ch 3, turn (This forms beginning loop)

*****UPDATE 1-14-11*****
When I say loop what I mean is the space that is created. This pattern is worked in the space created not the stitches. Look at the picture above I have provided and you can see what I mean. You create a circle and then do the stitch in the circle. I really don't know how to explain it better.

1 dc in loop, ch 1, 1 dc, ch 3, turn

(1 dc, ch 1, 1 dc)(in same loop) ch 1 (1 dc, ch 1, 1 dc)(in same loop) ch 3, turn

(1 dc, ch 1, 1 dc)(in same loop) (ch 1, 1 dc)(in next loop) (ch 1, 1 dc)(in next loop)(1 dc, ch 1, 1 dc)(in same loop) ch 3, turn

...continue pattern (1 dc, ch 1, 1 dc) in end loops so you are increasing 2 stitches every row *you should end up with a big triangle*

I had a total of 44 rows when I was done. (I think the scarf she has was a little longer but I have the movie on VHS and can't take a screen shot so I had to improvise LOL VHS hehe)

Fringe: I wrapped the yarn around a DVD case. I tied 2 pieces held together in each loop on the sides.

*************Update*****************
Here is a white one I made with baby yarn :D

******A picture to help start the pattern******
Here is a picture that might help explain the beginning better.
sorry about the bad pic
ok in the first step:
it says ch 4, 1 dc in 1st ch, ch 3, turn (This forms beginning loop)
In the picture I did the chain in black and the dc in red
next step:
1 dc in loop, ch 1, 1 dc, ch 3, turn
I did the chain in purple (I forgot to flip it in the pic but still the chain is on the end
dc 1, chain 1, dc 1, ch 3, turn (you should have 3 loops total by this point)
next step:
(1 dc, ch 1, 1 dc)(in same loop) ch 1 (1 dc, ch 1, 1 dc)(in same loop) ch 3, turn
what you will be doing from here on out is dc 2 in the end loops and 1 in all the loops in between. there will be one chain separating one stitch from the next.

**********************************************************************
Creative Commons License
This work by April Folts is licensed under a Creative Commons Attribution-Noncommercial-No Derivative Works 3.0 United States License.

*******************************************************************************
Any donations are welcome and appreciated.


Wednesday, October 7, 2009

Bella's Crochet Mittens *Twilight*

Ok it is just one mitten but I figured it out yay! It always takes me forever to finish mittens. By the time I get one done I don't want to do the other. I just took the one pic and flipped it to make 2. The actual mittens she wears in the movie are knit but I don't know how to knit so I made this.


Ok first step :Crochet a pair of mittens using your favorite pattern

Lay out a mitten and ch a piece from top all the way down to the tip and back up again. (I used an H Hook)

Then sc 2 rows.

Lay piece down on top of mitten then sew where the red lines in the picture are marked.


Then do another long piece the same size as the last one and weave it around. (First mitten in bottom pic) after that sew up the front where the red lines are in the pic. (second mitten in bottom pic)

Next sew all around the edge. Do an up and down stitch as if you were gathering something but don't bunch it. (I don't know what the stitch is called) and not a wrap around stitch. You want it to look like it is bumped up not blended in. (last mitten in bottom pic)


sorry about the horrible drawing. I took pics but the flash made it too bright and you couldn't see it very well. I hope this helps ;D

**********************************************************************
Creative Commons License
This work by April Folts is licensed under a Creative Commons Attribution-Noncommercial-No Derivative Works 3.0 United States License.

*******************************************************************************
Any donations are welcome and appreciated.


Sunday, October 4, 2009

Jacob Wolf *Twilight*

I already crocheted an Edward Cullen inspired doll a while ago so I decided to make Jacob Black inspired doll since New Moon is coming out next month. Yay! I am so happy about how he turned out. My fingers still hurt though. I have searched online for crocheted wolves and didn't have very much luck so I went to just pics of wolves. What distinguishes a wolf from a dog? Well, from the pics, it is apparently the white underbelly. There are a lot more differences but that is what stood out the most for me. I think I am gonna take a break from using the small hook for a while lol ah the pain of art :D
Pattern Available at My Etsy Store


Thursday, October 1, 2009

Mario Mushroom Hat *Free Pattern*

so I was sitting in my chair crocheting while watching my husband play the Wii and I thought "I should make him a Mario Mushroom hat" I made him a 1up hat a couple years ago so I decided to make the red one this time :) When I was done he asked me why I made him the red one and not the green one. (Green is our favorite color) and I proudly stated "Because bigger is better!" LOL also it is the original Nintendo colors. Anyways, I figured I would post the pattern because Christmas is coming up. I don't know about most of you but I am really poor and make a lot of my Christmas gifts.


*****UPDATE 11-23-09*****
I made a tutorial on how to switch colors and use a chart
Here is the link
*************************

Mario Mushroom Hat
by: AprilDraven

for personal use only

Gauge: 4 inches = 13 stitches and 14 rows
My head size is 22 and a half inches around so adjust your hook size accordingly. Remember yarn stretches a little bit so this hat will fit inches bigger too.

Yarn: regular 4 ply worsted yarn

H hook

Abbreviations:
Rnd: round
Sc: single crochet
Ss: slip stitch
FO: Fasten off

*NOTE: use a marker and work in rounds*

With black ch 1 or form magic circle
Rnd 1: 8 sc in ring
Rnd 2: 2 sc in each sc around (16)
Rnd 3: *1 sc, 2 sc in next sc* rep from * to * around (24)
Rnd 4: *2 sc, 2 sc in next sc* rep from * to * around (32)
Rnd 5: *3 sc, 2 sc in next sc* rep from * to * around (40)
Rnd 6: sc in each sc around
Rnd 7: *4 sc, 2 sc in next sc* rep from * to * around (48)
Rnd 8: sc in each sc around
Rnd 9: *5 sc, 2 sc in next sc* rep from * to * around (56)
Rnd 10: sc in each sc around
Rnd 11: *6 sc, 2 sc in next sc* rep from * to * around (64)
Rnd 12: sc in each sc around
Rnd 13: *7 sc, 2 sc in next sc* rep from * to * around (72)
sc 20 then start the black on the chart
Rnd 14-29: Sc in each sc around (16 rounds)
Switch to grey or whatever color you are using for the main hat color.
Rnd 30&31: Sc in each sc around
switch to trim color
Rnd 32: Sc in each sc around, ss 1
FO
The picture is upside down so it is easier to put on a hat :D


**********************************************************************
Creative Commons License
This work by April Folts is licensed under a Creative Commons Attribution-Noncommercial-No Derivative Works 3.0 United States License.

*******************************************************************************
Any donations are welcome and appreciated.