
I hope you all can follow this. Enjoy!
********************UPDATE*************************
This is the IMPROVED PATTERN as of 6-28-2009
***************************************************
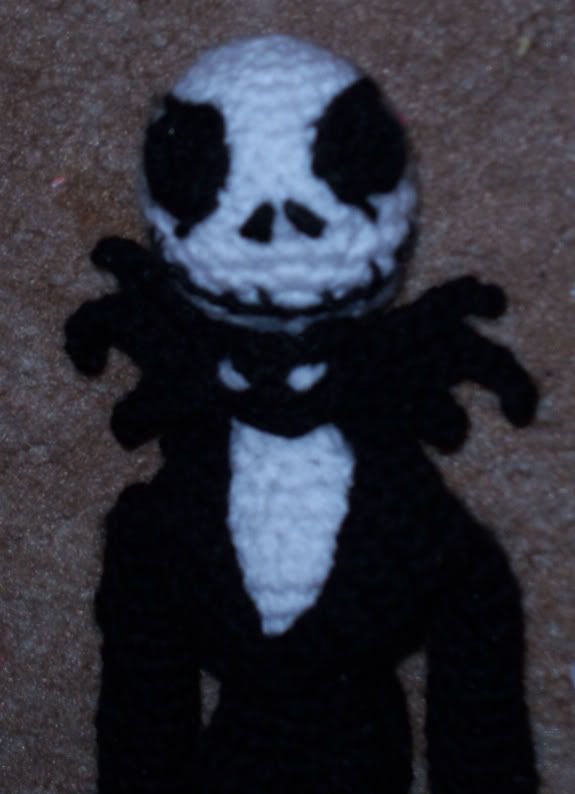
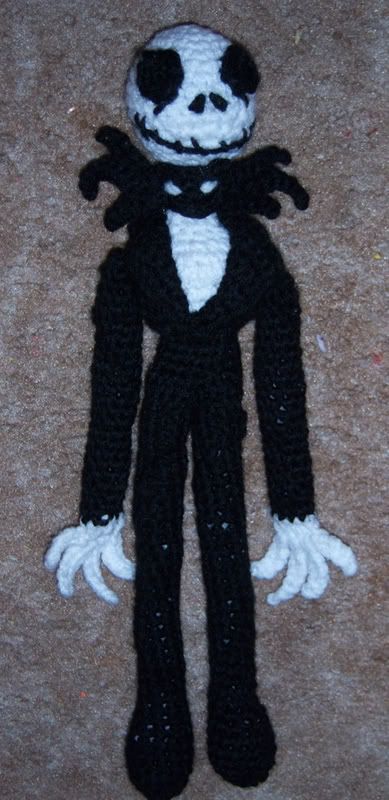
Jack Skellington
By: April Folts
Hook size: steel 2.75mm
Yarn: Acrylic
Approximate size:
Height: 15 inches
STITCH EXPLANATION:
sc2tog (sc dec) (Insert hook into next st and draw up a loop) twice, yarn over and draw through all 3 loops on hook – 1 sc decreased.
ss = slip stitch
sc = single crochet
ch = chain
Rnd = round
YO = yarn over
FO = Fasten off
Materials:
Acrylic Yarn colors:
White and Black
NOTES:
Pattern is worked in rounds except when specified different.
Use marker to indicate beginning of Rnds.
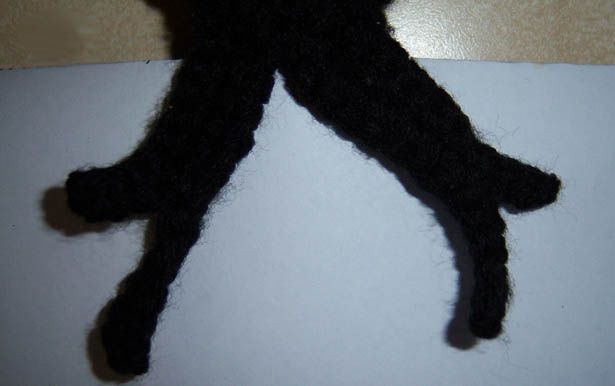
Feet and Legs (make 2)
With Black ch 1
Rnd 1: Work 4 sc in first ch
Rnd 2: 2 sc in each sc (8)
Rnd 3: *Sc in next sc, 2 sc in next sc*, rep from * to * around (12)
Rnd 4-6: Sc in each sc around (3 rounds)
Rnd 7: Sc2tog 2 times, 8 sc (10)
(Stuff while crocheting. It is easier than stuffing at the end)
Rnd 8-35: Sc in each sc around (27 rounds)
FO
Body
I apparently didn’t write the stitch count here so if anyone wants to help and tell me what it is I would be most grateful.
With Black
Rnd 1: Hold the two legs together and stitch the inner legs together (the crotch) and then sc around both legs for beginning the body.
Rnd 2-5: Sc in each sc around (4 rounds)
Rnd 6: *Sc in next sc, 2 sc in next sc*, rep from * to * around
Switch to White
Rnd 7: *Sc in next sc, 2 sc in next sc*, rep from * to * around
Rnd 8 & 9: Sc in each sc around (2 rounds)
Rnd 10: *Sc in next sc, Sc2tog*, rep from * to * around
Rnd 11: Sc in each sc around (1 round)
Rnd 12: *Sc in next sc, Sc2tog*, rep from * to * around
Lightly stuff
Rnd 13: Sc2tog around
Rnd 14-16: Sc in each sc around (3 rounds)
FO
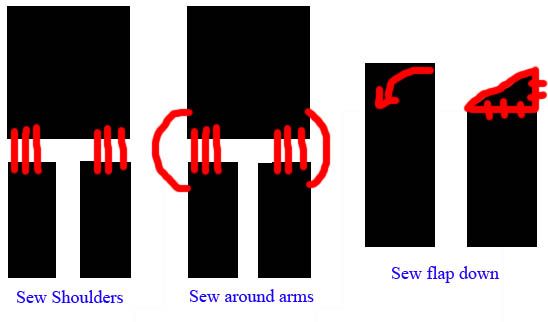
Jacket Front (Make 2)
This is NOT worked in Rounds
Row 1: Ch 10, turn, sc in 2nd chain from hook
Row 2-9: Sc in each sc across (8 rows)
FO
Jacket Back
This is NOT worked in Rounds
Row 1: Ch 10, turn, sc in 2nd chain from hook
Row 2-11: Sc in each sc across (10 rows)
FO
(A) (see picture for construction)
Head
With White ch 1
Rnd 1: Work 4 sc in first ch
Rnd 2: 2 sc in each sc (8)
Rnd 3: *Sc in next sc, 2 sc in next sc*, rep from * to * around (12)
Rnd 4: *Sc in next 2 sc, 2 sc in next sc*, rep from * to * around (16)
Rnd 5: *Sc in next 3 sc, 2 sc in next sc*, rep from * to * around (20)
Rnd 6: *Sc in next 4 sc, 2 sc in next sc*, rep from * to * around (24)
Rnd 7-10: Sc in each sc around (4 rounds)
Rnd 11: *Sc in next 4 sc, Sc2tog*, rep from * to * around (20)
Rnd 12: *Sc in next 3 sc, Sc2tog*, rep from * to * around (16)
Rnd 13: *Sc in next 2 sc, Sc2tog*, rep from * to * around (12)
Stuff
Rnd 14: *Sc in next 2 sc, Sc2tog*, rep from * to * around (8)
FO & weave hole shut
Eyes (make 2)
With Black ch 1
Rnd 1: Work 4 sc in first ch
Rnd 2: 2 sc in each sc (8)
Rnd 3: *Sc in next sc, 2 sc in next sc*, rep from * to * around (12)
Attach to face
Arms & Hands (make 2)
With Black ch 8 and join with a ss
Rnd 1: ch 1, Sc in each sc around
Rnd 2-20: Sc in each sc around (8)
Switch to White
Rnd 21: Sc in each sc around (8)
Squeeze flat and Sc closed
(4 stitches jack has 4 fingers)
ch 5, sc back down, ss to next space
ch6, sc back down, ss to next space
ch8, sc back down, ss to next space
ch6, sc back down, ss to next space
FO
Stuff
(Attach arms then sew the jacket around the arms)
Tails of jacket
With Black
Attach yarn to back of jacket starting at an edge
6 sc across the middle of the back of the jacket
Ch 1, turn, sc across
Ch 10, sc back down just like the fingers
ss over 1, sc back up the same piece 7 stitches, Ch 6 turn and go back down
ss next space, ch 13, sc down, ss in next space and ch1, 7 sc up, ch 4, sc back down
FO
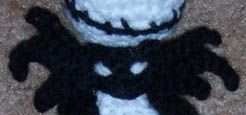
(B)(see Picture)
Bat Tie
With Black ch 1
Rnd 1: Work 4 sc in first ch
Rnd 2: 2 sc in each sc (8)
Ch 1, 2 sc, ss 3, ch1, 2 sc, ss 4, ch 1, 2 sc, turn, sc2tog,
ss to other side and do the same
Sew white eyes on the head
(C)(see Picture)
Attach black yarn to the side of the bat head, ch 6 and work down like the tails of the jacket
ss next space over, ch1 and work up 4 sc, ch 5, sc down, ss over 1 space, ch 1, work back up
3 sc, ch 3, work back down
FO
Do the same to the other side.
FO with a long tail for wrapping around the neck to hold the tie on him.
(A)
(B)
(C)
**********************************************************************

This work by April Folts is licensed under a Creative Commons Attribution-Noncommercial-No Derivative Works 3.0 United States License.
37 comments:
That is awesome!!!
Yeah, I like the crochet version better than the knit. I was going to develop a crochet pattern. I still might, based on the knit pattern. This one is great!
Cora
You have made my day with this pattern! Fantastic job!!! Thank you!!!!!!!
Jane
You did a really great job! It's very good. thank you and thank you for sharing!
My daughter loves Jack!!!
Thanks for the pattern
made
i lov the jack skellington crochet
but i'm new to crochet do you think you can help me? leave a shout out to this website last.fm/user/rockeremogirl.com if you do i appreciate it.
Thanks so much for sharing this fantastic pattern, I made one for my daughter's Christmas gift and she was wowed!
this pattern is great - thanks for sharing!
I love this pattern thanks so much for posting it. I am almost done with Jack but am having problems with the directions for his bat tie. Can you clarify them for me?
Thanks again
Thanks for the pattern, it was fun to do!
http://www.homesteadblogger.com/countryhomeschoolin/149166/
Thank you for the pattern! my bf loves Jack Skellington. lol. i'm gonna attempt to make him one! :)
I am having a hard time figuring out the jacket and assembly. Any help would be appreciated! This is an awesome pattern
Victoria: What part exactly are you having trouble with? I haven't touched this pattern in years so I might not be able to help. I'll try though.
I'm it sure how to put the two front pieces together with the back. It seems the two front pieces are only two rows less than the back and look much bgger than your diagram.
I'm with Victoria. I've made Mr. Skellington up to the jacket, and I'm stumped on the Jacket and its assembly.
I'm not sure if I followed the stitching instructions correctly. Here's what I've done so far...
for the jacket front: 8 rows of 9sc
for the jacket back: 10 rows of 9sc
in trying to put them together, it just didn't seem to make sense. The front pieces were almost as big as the back piece.
So I ripped out one of the fronts, and I took another look at the directions. For rows 2-X (depending on if it's jacket front or back) it says to sc in ea sc across. So then I say, okay, technically, I've only been instructed to crochet one sc and that was in the 2nd ch from the hook, so I made my 8 rows for the jacket front, and each row only has one sc in it. This looks much more like the diagram (A), but now I'm puzzled as to what to do with the strand of chains hanging off this piece.
Also, it seems there's a third drawing in the diagram, but it seems to be cut off. Could be my browser?
I think I'll put it down for the night--been working on it all day.
Thanks in advance for any offerings you may have :)
--jenny
Jenny and Victoria: If you either click on the picture or right click on it and select view picture you should be able to see the whole thing. The two pieces in the front will fold over. If you see the last picture it should make sense. It might help to do the first step in the picture, then put it on him and then sew up the sides to the armpit. After that you fold the flaps on his chest to the side and sew down. I have been meaning to re do that pattern for years now. I just keep forgetting. I can do a much better one now. Hopefully I can get to it this month. Let me know if this helps. If it doesn't I might be able to make a different picture to help. I am better at making pictures now :)
Victoria: Sorry. Your message went into my spam folder for some reason. I wish I knew how to stop that from happening randomly.
Hey, first off, thanks for responding so quickly! Since it's such an old post, I wasn't sure if you'd see my comment :) hooray!
Well, I'll be a monkey's uncle! I didn't realize right clicking and selecting to view the image would let me see the whole thing--I thought I was seeing the whole thing, and my browser was cutting it off or something.
I was a little...shall we say weary?...last night when I posted because I'd been working on Jack all day trying to finish him for Halloween...but the twist is that I was working on him on my long city-bus rides! Kinda grueling mentally....with the bus and all. So today I took the opportunity to hold up the pieces to the doll as far as I've made him and it makes much more sense now. I think what was mis-leading was in the photo (A) it seems like my front pieces should be about half the width of the back piece. As they are, mine are about 4/5th the size of the back piece, but if they were half, there's no way that jacket would fit him.
Don't worry about continually forgetting to re-work the pattern...life happens, and your interests change and whatnot--would you mind if I posted a few suggestions here? Should I email them to you instead?
Thanks again for getting back with us...hope this helped Victoria too!
In other news, I think I'm going to make his jacket removable or just make a cover-up out of my scrap red yarn so that he can be Santa Jack also!! So instead of a Halloween doll, I'll have him in time for him to be a Christmas doll!! I'll be in touch with how it goes!
Thanks again!
--jenny
Jenny: If you have any tips by all means post them here so other people can benefit too. I am much better at writing patterns and crocheting in general now. This is one of my first patterns. I'm just happy people can still sort of follow it. When I get the time I will make another one and take pictures along the way. I didn't have a digital camera then either. Now I do :)There is soooooo much I would do differently now. I'm curious what your tips are.
Made this for my son for Christmas doubling up stitches & rows to make a really big one. He ended up at over 2ft just what my son wanted :) Perfect
I never thought to double up on stitches. Great idea :)
Upon completing Jack Skellington, finally, and some further ponderance, I realized that there was a lot less left to question than I'd originally thought.
this guy was tedious, but WORTH the effort! I was so very excited when I finished him! It took me so long (October-February) because the inspiration to work with such tedium was few and far between.
Maybe it's just me, but this pattern proved to be a challenge because of all it's "littleness" and all the little parts to join together. The stitching and directions themselves weren't necessarily difficult, merely the high level of detail in not only his appearance but also his assembly. A worthy challenge, indeed!
He now sits in the bathroom and watches us do our business from the towel hooks hanging over the door.
A grand and heartfelt thanks for the gigantic effort it must have taken to create this pattern!!
I ended up mixing and matching different yarns as I ran out and had to substitute (such as unwinding pieces of chunky yarn to acquire a thinner white yarn without buying more...) which is likely where most of my difficulties came from.
as for some constructive feedback:
The Body
My stitch count is 16 for the first 4 rounds leaving two crotch stitches. As I'm examining my finished Jack, it looks like I sewed the legs together before stitching the body rounds. Just another means to the same ends.
Tails of Jacket
When I followed the directions exactly, I got off-center tails. Perhaps I mis-interpreted. The instructions in this section are for making both tails at once rather than each one separately, right? What I ended up doing was starting the tails two rows in from the edge of the back of the jacket. That way I had centered tails and two extra rows outside each side of the tails on the back of the jacket.
Bat Tie
My bat tie ended up being WAY too gigantic for his neck and head. Again, likely because I chose to mix and match yarns. What ended up working was an approximate "halving" of this portion of the pattern. It required a little finagling, but the accomplishment was highly satisfying. :)
Great job, and thanks for sharing and your continued creativity!!
--jenny
Hi! I'm trying to figure out how to do the bat tie and i'm having a little bit of trouble. Can you help?
Hello! I came across this pattern just love it! I am the editor of AllFreeCrochet.com and would love to feature your tutorial on my site with full credit to you. I know my readers would love it as well, and in return would generate some nice traffic to your site. If you agree and would like us to feature your project, our readers will simply click the link to your blog to get your full tutorial. It's really that simple. Please let me know if this would be ok. I look forward to hearing from you!
Jenny
JennyB: Sure, go ahead :)
Hello, I have some difficulty with the bat tie. I do not know if it's me who does not understand how to do it, but I can not do it at all. But I'm not my first realization ... I've done several bosses, but I'm trying all ways possible, I can not make the bat tie. Can you help me please?
Thank you in advance.
M-J
marie-julie Doucet: The bat tie is the most difficult part. This was before I got the hang of writing patterns. Essentially you make a circle, then starting on one side you chain however many it says to chain then ss back down the chain (this creates a section that sticks out from the circle) then you go back to the main circle and continue working around. I'm sorry it is difficult. I keep meaning to re do the pattern but I haven't really found the time yet.
I'm trying to make this for my granddaughters birthday. She loves Jack Skellington. I know you made this quite a while ago and I read the comments but I don't understand the jacket. Where are the shoulder pieces and arms I can't visualize them. I see the arm directions but not the shoulders.
If possible would you explain it more. It would also help if you give directions for putting things together
Your Jack turned out great and I'd love to make it like that for my granddaughter
Is there a way i could show you a picture when I'm done
I knowill this is a older post but am hoping you still get updates...I am totally confused with the bat tie. In the previous post you said make like a circle and then do the chains and go back down the chains. Is there any way to maybe be a little more specific or check the pattern to see if I'm missing something
...I only see like ch 1 or ch 2 not really enough
this is my problem also with the bat tie - it says rnd 2 - 2sc in each sc (8) then it says to ch 1, 2 sc, ss 3, ch 1, 2 sc, ss 4, ch 1, 2 sc, turn, sc2tog -- I'm just not understanding that part at all -- almost tempted to leave the tie off but then it wouldn't really look right --- any help you can give would be very much apprecaited -- thank you
Belinda Gallant: To make the tie, after the 2 sc in each continue working in rounds (or around) but omit the turn and do the sc2tog. This will create a point. Now slip stitch until you reach the other side and sc2tog to make the other point. To make the "fingers", I started 2 stitches before point and just slip stitched around to finish the other side. This was my interpretation of the pattern and it worked out pretty well. I hope this helps!
My great niece loves this. I can't wait to make this for her for Christmas. Thank you for the pattern.
My great niece loves this. I can't wait to make this for her for Christmas. Thank you for the pattern.
Thank you for the awesome pattern!!
How do I save this pattern?
Hi
Im having trouble understanding the jacket. I hope you can help me :(
Jean
Gorgeous Blog Towel digitizing nicee
Post a Comment