My daughter just got her hair cut really short. (She wanted LINK hair from the legend of Zelda) So I wanted to crochet her something more girly to wear. This is what I came up with. What do you think?
I am taking another break. Life has just gotten overwhelming lately. Once things settle down a bit I will have more projects up. If I said I would do something and I haven't gotten around to it yet please send me another message. I am working on a new organization system but it isn't 100% worked out yet.


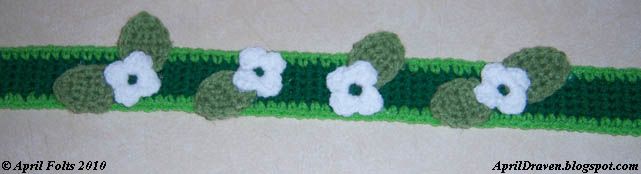
Flower Headband
by: AprilDraven
For Personal Use only
Measure your head around where the headband will go. My daughter’s head is 19 ½ inches.
*You will need Hot Glue if you don’t want to sew, I used Hot Glue :) *
Hook size: 3.25 MM
Yarn: 100% Acrylic Worsted Weight 4 ply
Abbreviations:
Rnd: round
Sc: single crochet
Dc: double crochet
Ss: slip stitch
Hdc: half double crochet
Sk: skip
FO: Fasten off
With Paddy Green or the color you are making the band.
Row 1: 3 sc in ring, ch 1, turn (3)
Row 2: 2 sc in next sc, 1 sc, 2 sc in next sc, ch 1, turn (5)
Row 3-77: 5 sc, ch 1, turn (74 rows or until you are ½ inch before the end)
Row 78: 1 sc, ch 3, sk 3, 1 sc, ch 1, turn (this is the row that will create the button hole)
Row 79: sc2tog, 1 sc, sc2tog, ch 1, turn (3)
Row 80: sc2tog, 1 sc, ss 1, FO
Attach Spring Green or the color you are using for the trim to an end, sc around entire piece.
Leaf (Make 6 or more depending on how many leaves you want and your head size)
With Tea Leaf Green
Row 1: 2 sc in ring
Row 2: 2 sc in next sc (4) ch 1, turn
Row 3-5: 4 sc, ch 1, turn (3 rows)
Sc around entire piece, ss 1, FO and set aside
FLOWER (Make 4 or more depending on how many you want and your head size)
RND 1: ch 5, join to form a ring
The following isn’t worked in each stitch; it is worked in the circle not in the stitches.
RND 2: ch 1, *1 hdc, 1 dc, 1 hdc, 1 sc, 1 ss, ch 1* rep from * to * 3 more times, ss 1, FO
Assembly: Sew button on then Hot Glue the flowers and leaves on in the arrangement you want. You could sew them on but that would take longer. For extra embellishment you can glue beads in the middles of the flowers like I did.
Here is a picture to help :)
**********************************************************************

This
work by
April Folts is licensed under a
Creative Commons Attribution-Noncommercial-No Derivative Works 3.0 United States License.
***********************************************************************
Any donations are welcome and appreciated.


