Here is a couple pics of what the scarf/shawl is supposed to look like


******UPDATE 11-20-09*****
Here is a pic to show an up close view of the stitches

I hope this helps clear up some confusion. (this is just the tip, not the whole thing)
************************
Sweet November Scarf/Shawl
by: AprilDraven
for personal use only
J hook
Abbreviations:
Rnd: round
ch: chain
dc: double crochet
Yarn: I used a little over 6 oz of Caron Simply Soft 100% acrylic Worsted medium 4ply Autumn Red
ch 4, 1 dc in 1st ch, ch 3, turn (This forms beginning loop)
*****UPDATE 1-14-11*****
When I say loop what I mean is the space that is created. This pattern is worked in the space created not the stitches. Look at the picture above I have provided and you can see what I mean. You create a circle and then do the stitch in the circle. I really don't know how to explain it better.
1 dc in loop, ch 1, 1 dc, ch 3, turn
(1 dc, ch 1, 1 dc)(in same loop) ch 1 (1 dc, ch 1, 1 dc)(in same loop) ch 3, turn
(1 dc, ch 1, 1 dc)(in same loop) (ch 1, 1 dc)(in next loop) (ch 1, 1 dc)(in next loop)(1 dc, ch 1, 1 dc)(in same loop) ch 3, turn
...continue pattern (1 dc, ch 1, 1 dc) in end loops so you are increasing 2 stitches every row *you should end up with a big triangle*
I had a total of 44 rows when I was done. (I think the scarf she has was a little longer but I have the movie on VHS and can't take a screen shot so I had to improvise LOL VHS hehe)
Fringe: I wrapped the yarn around a DVD case. I tied 2 pieces held together in each loop on the sides.
*************Update*****************
Here is a white one I made with baby yarn :D

******A picture to help start the pattern******
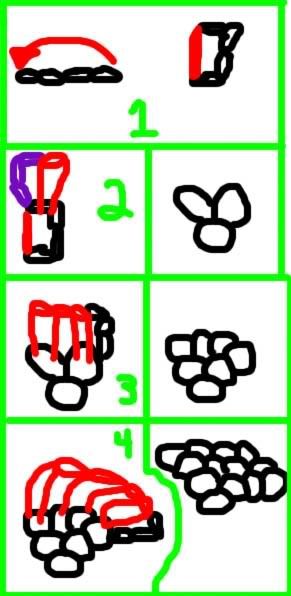
Here is a picture that might help explain the beginning better.
sorry about the bad pic
ok in the first step:
it says ch 4, 1 dc in 1st ch, ch 3, turn (This forms beginning loop)
In the picture I did the chain in black and the dc in red
next step:
1 dc in loop, ch 1, 1 dc, ch 3, turn
I did the chain in purple (I forgot to flip it in the pic but still the chain is on the end
dc 1, chain 1, dc 1, ch 3, turn (you should have 3 loops total by this point)
next step:
(1 dc, ch 1, 1 dc)(in same loop) ch 1 (1 dc, ch 1, 1 dc)(in same loop) ch 3, turn
what you will be doing from here on out is dc 2 in the end loops and 1 in all the loops in between. there will be one chain separating one stitch from the next.
**********************************************************************

This work by April Folts is licensed under a Creative Commons Attribution-Noncommercial-No Derivative Works 3.0 United States License.
*******************************************************************************
Any donations are welcome and appreciated.