Monday, May 17, 2010

Gnome Hat

I was watching Snow White and the 7 dwarfs with my daughter and I noticed that the Dwarfs had these hats that were rounded in the back, not a sharp point, but rounded. I thought that was cool so I made my daughter a hat like it. Then I put it on her and she looked more like a forest gnome, or at least how I picture forest gnomes to be lol. I'm not into the bright red cone hats haha. I think Gnomes would blend into the forest not stand out right? anyways she likes it so mission accomplished hehe. If you can't see the pic either click on it or right click on it and select view picture. The pattern is available for $3 in my Etsy Shop if anyone is interested. I also have instructions on how to make it bigger so it will fit an adult too ;) What do you think?


Sunday, May 16, 2010

Pretty Pixie Hat

I have been missing my Grandma a lot lately (she moved to Georgia which is really far away from Michigan) She used to Knit/Crochet hood/hats like this when I was little. I was too little to know the difference between Crochet and Knit stuff lol anyways this type of hat reminds me of her. Hers weren't as detailed as mine but it still makes me think of her :) I made my daughter one and it makes me feel like things have gone full circle. My Grandmother made one for me and I made one for my daughter :D I omitted the big pom poms she usually put on everything though haha. (I'm not a big fan of pom poms) My daughter always wants everything orange so we compromised on the yarn color of hers haha. I'm not into multi colored yarn but I really didn't feel like making another orange hat haha. (she has a TON of orange hats)

If you can't see the pictures click on them or right click on them and select view picture. I have the pattern available in My Etsy Shop for $3 if anyone is interested. What do you think?


Saturday, May 8, 2010

GIR Bag (Invader Zim)

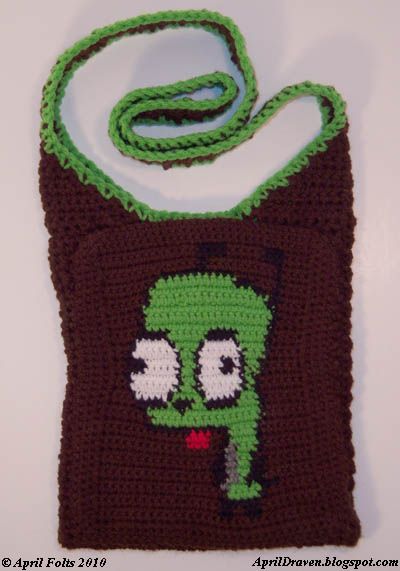
I love GIR from Invader Zim so I just had to make a bag ;D I wear a lot of skirts without pockets and I hate having a purse so I figured I would crochet a small bag to carry my stuff in. I still need to put some velcro in the pocket to keep it shut. I haven't decided on if I want to keep the main part closed or not, I kinda like it open.

What do you think?


Ok here is the pattern:

GIR Bag

By: AprilDraven

For Personal Use only

Hook size: 3.25 MM for the pocket and H hook for the rest of the bag

Yarn: 100% Acrylic Worsted Weight 4 ply

Abbreviations:
Rnd: round
Sc: single crochet
Ss: slip stitch
FO: Fasten off

Make the Gir pocket first so you can make sure you are making the bag wide enough.
With 3.25MM hook
Ch 31, turn, sc in 2nd chain from hook and in every sc across, ch 1, turn, 15 sc then start the chart.


Crochet loose or else it will turn out looking more like an hour glass than a rectangle.(That is what happened to mine) when you finish the pocket,if you want, sc around the whole thing 3 rounds. FO

The body of the bag: Use H hook

Ch 31, turn, sc in 2nd loop from hook and in every stitch across.

ch 1, Sc 80 rows. (Or until your pocket fits) *NOTE: If chaining 31 isn’t enough for your pocket to have about a half an inch clearance on both sides chain some more.

Fold in half and sew up the sides

Turn inside out

Straps:
At the top of the bag where the seam is, count 10 stitches on each side of the seam. The seam being in the middle and 20 stitches total. Attach yarn and sc 20 stitches. (I hope this makes sense)

Ch 1, turn, sc2tog, 16 sc, sc2tog (18)

Ch 1, turn, sc2tog, 14 sc, sc2tog (16)

Ch 1, turn, sc2tog, 12 sc, sc2tog (14)

Ch 1, turn, sc2tog, 10 sc, sc2tog (12)

Ch 1, turn, sc2tog, 8 sc, sc2tog (10)

Ch 1, turn, sc2tog, 6 sc, sc2tog (8)

Ch 1, turn, sc2tog, 4 sc, sc2tog (6)

Ch 1, turn, sc2tog, 2 sc, sc2tog (4)

For 50 rows: ch 1, 4 sc, turn

Repeat for the other side and sew the 2 straps tog.

Attach green yarn and sc around the front and back edges of the bag.
**********************************************************************
Creative Commons License
This work by April Folts is licensed under a Creative Commons Attribution-Noncommercial-No Derivative Works 3.0 United States License.

*******************************************************************************
Any donations are welcome and appreciated.


Sunday, May 2, 2010

Doctor Who Doll Adjustments

Ok so a lot of people have asked me to write up a pattern for my Doctor Who doll. I finally just got my notes made into a pattern. It is actually adjustments to my Phantom of the opera doll. (I sell the pattern for the phantom doll in my Etsy Store) Here are the adjustments to that pattern:


The 10th Doctor
© April Folts 2009


These are the alterations to the Phantom of the Opera doll I made.

Legs:

Begin with White
Rnd 6: Switch colors to Cream
Rnd 10: Switch colors to Dark Brown

Body:

Color B is Dark Brown
Color C is White

Arms:
Do no sew on until after you attach the jacket
Color A is skin color
Color C is Tan (Jacket Color)

Collar is White

Jacket (Do not make cape)

Row 1: Ch 34, sc in 2nd Ch from hook
Row 2-31: Ch 1, sc in each sc, turn (30 rows)
Row 32: Sc around entire piece, FO
Sew jacket on then sew arms on so there is a little flap of the jacket in front. Then with Tan (Jacket color) sc around the collar, over the arms then around the whole jacket.

Use Pipe cleaners for the Glasses and eyebrows.

a link to the original post is here